Deploy a Prism Central VM
Installing Prism Central (1-Click Method)
You can install a Prism Central VM using the “1-click” method. This method employs the Prism web console from a cluster of your choice and creates the Prism Central VM in that cluster.
The “1-click” method is the easiest method to install Prism Central in most cases. However, you cannot use this method when:
- The target cluster runs Hyper-V or XenServer (or mixed hypervisors)
- You do not want to install the Prism Central VM in a Nutanix cluster
- You do not have access to a Nutanix cluster
Requirements
- The specified gateway must be reachable.
- No duplicate IP addresses can be used.
- The container used for deployment is mounted on the hypervisor hosts.
- When installing on an ESXi cluster:
- vCenter and the ESXi cluster must be configured properly. See the vSphere Administration Guide for Acropolis (using vSphere Web Client) for details.
- vCenter must be registered in Prism.
- DRS must be enabled in vCenter.
- vCenter is up and reachable during the deployment.
Installation Process


See Identify Prism Central Requirements for Sizing Information.


Installing Prism Central (Manually)
When the 1-Click Method is not an option, you can install a Prism Central VM manually.
Prerequisites
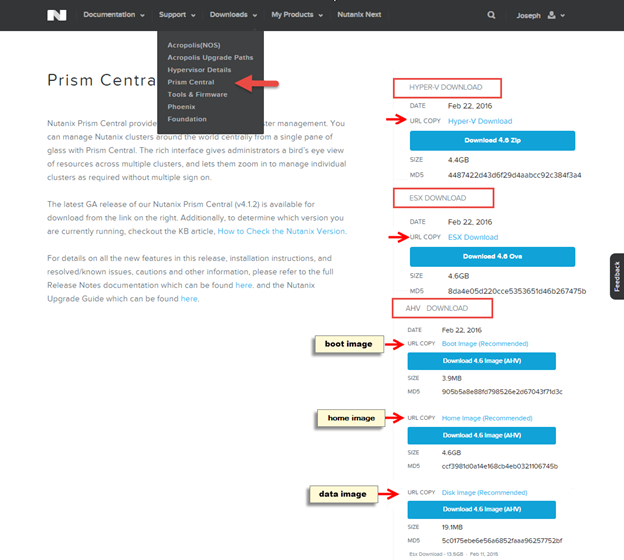
Download the Prism Central file(s) for the desired hypervisor.
VMware
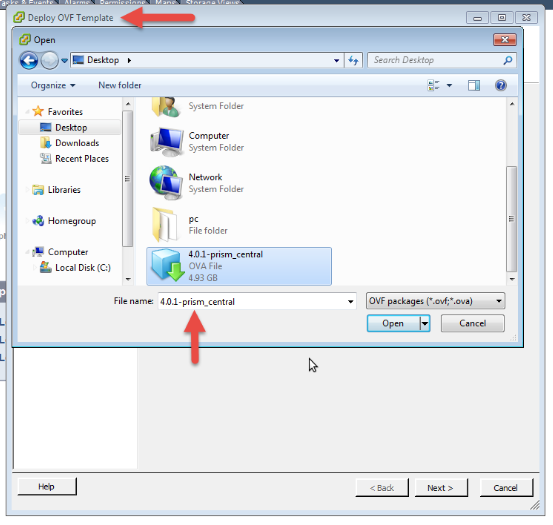
- Install the OVA file as follows:
- Connect to vCenter or an ESXi host using the vSphere client.
- Select the OVA file, deploy it, and then start the Prism Central VM.
- Note: Configure the VM to have at least 16 GB of memory, 4 vCPUs, and a NIC. This is the minimum recommended configuration for a Prism Central VM.
- Log into the Prism Central VM through the vSphere console (user name “nutanix” and password “nutanix/4u”).
- Assign a static IP address to the Prism Central VM as follows:
- Open the ifcfg-eth0 file for editing.
- The following command opens the file using the vi editor:
- Update the
NETMASK,IPADDR,BOOTPROTO, andGATEWAYentries as needed.- Warning: Carefully check the file to ensure there are no syntax errors, whitespace at the end of lines, or blank lines in the file.
- Save the changes.
- Remove any existing Nutanix Controller VM entries, that is ones which include “NTNX-<number>-CVM”, from the/etc/hosts file. (Be careful that you do not remove any other entries from the file.)
- To edit the file using vi, enter
- When the Prism Central VM starts the first time and DHCP is enabled in the network, an entry similar to the following is added to the /etc/hosts file. This entry (if present) needs to be removed from the/etc/hosts file before restarting the Prism Central VM in the next step, which generates a new entry if DHCP is enabled.
- Restart the Prism Central VM.
- Log into the Prism Central VM again through the vSphere console and then enter the following command to create a cluster:
- The static_ip_address is the Prism Central VM IP address you assigned to the
IPADDRparameter in step 4.
$ sudo vi /etc/hosts
$ sudo reboot
$ cluster –cluster_function_list=”multicluster” -s static_ip_address create
$ sudo vi /etc/sysconfig/network-scripts/ifcfg-eth0
- This completes Prism Central installation. The next step is to register clusters with Prism Central.
AHV
In this procedure, the Prism Central VM deployment consists of three virtual disks, where rel.# is the release version, deployed in order:
- Boot disk – rel.#-prism_central-boot.qcow2
- Home disk – rel.#-prism_central-home.qcow2
- Data disk – rel.#-prism_central-data.qcow2
- Under the AHV Download heading, click the Download <release#> Tar (AHV) button for each image to download the boot, home, and data image files to your workstation. The <release#> represents the AOS version number. Repeat this step for the links for the home and data disk images.
- Log in to the Prism web console of the target cluster and select Image Configuration from the task icon pull-down list of the main menu. The Image Configuration window appears. See Use the Image Service to deploy a VM.
- Click the Upload Image button
- Enter a name, for example pc_boot, and optional description (annotation) for the boot image.
- Select Disk as the image type.
- Select a storage container to use from the pull-down list.
- Select Upload a file and select the boot image downloaded to your workstation in step 2.
- Click the Save button.
- Repeat this step for the home (pc_home) and data disk (pc_data) image files.
- Create a new VM from the images as follows:
- In the VM dashboard, click the Create VM button.
- In the Create VM window, enter appropriate information in the name, compute details, and memory fields, and (if needed) click the Add New NIC button to create a network interface for the VM.
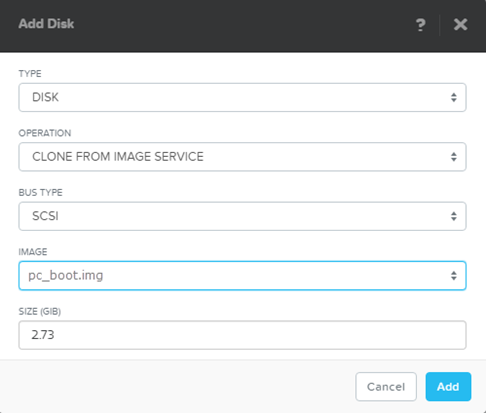
- Click the Add New Disk button and attach a boot disk.
- Type: Select Disk.
- Operation: Select Clone from Image Service.
- Bus Type: Select SCSI.
- Storage Container: Select a storage container from the list of available for the Prism
- Image: Select pc_boot.img (or whatever you named the boot image, originally downloaded as rel.#-prism_central-boot.qcow2) from the list of images.
- Size (GiB): Enter the disk size (in GiB). This value is populated automatically from the selected image; do not change the value that appears in this field unless directed to do so by Nutanix customer support.
- Click the Add New Disk button again and attach the home disk.
- The steps are the same as for the boot disk except the image file name, which is pc_home.img (or whatever you named the home image).
- Click the Add New Disk button again and attach the data disk.
- The steps are the same as for the boot disk except the image file name, which is pc_data.img (or whatever you named the data image).
- When all the settings are correct, click the Save button to create the VM.
- Go to the VM dashboard table view, select the new VM (in the table), and then click the Power on action link (below the table) to start up the VM.
- Log into the Prism Central VM through the vSphere console (user name “nutanix” and password “nutanix/4u”).
- Assign a static IP address to the Prism Central VM as follows:
- Open the ifcfg-eth0 file for editing.
- The following command opens the file using the vi editor:
- Update the
NETMASK,IPADDR,BOOTPROTO, andGATEWAYentries as needed.- Warning: Carefully check the file to ensure there are no syntax errors, whitespace at the end of lines, or blank lines in the file.
- Save the changes.
- Remove any existing Nutanix Controller VM entries, that is ones which include “NTNX-<number>-CVM“, from the/etc/hosts file. (Be careful that you do not remove any other entries from the file.)
- To edit the file using vi, enter
- When the Prism Central VM starts the first time and DHCP is enabled in the network, an entry similar to the following is added to the /etc/hosts file. This entry (if present) needs to be removed from the/etc/hosts file before restarting the Prism Central VM in the next step, which generates a new entry if DHCP is enabled.
$ sudo vi /etc/hosts
$ sudo vi /etc/sysconfig/network-scripts/ifcfg-eth0
- Open the ifcfg-eth0 file for editing.
- Restart the Prism Central VM.
- Log in to the Prism Central VM again and then enter the following command to create a cluster:
- The static_ip_address is the Prism Central VM IP address you assigned to the
IPADDRparameter in step 4.
$ sudo reboot
cluster –cluster_function_list=”multicluster” -s static_ip_address create
- Open the ifcfg-eth0 file for editing.
- This completes Prism Central installation. The next step is to register clusters with Prism Central.