Set up and Configure Self Service Restore
General Requirements and Limitations of Self Service Restore
- Set disk.enableUUID=true in the .vmx file for the VMs on ESXi.
- Guest VM must have Nutanix snapshots configured via a protection domain. Self service restore is not supported for the snapshots that you take from the VM table view.
- vStore protection domains are not supported.
- Volume groups are not supported.
- Snapshots that are created in AOS 4.5 or later releases are only supported.
- IDE/SCSI disks are only supported. SATA, PCI, and delta disks are not supported.
- NGT must be enabled.
- This feature requires a Pro (or Ultimate) license.
- The Nutanix administrator can enable this feature for a VM only through nCLI, and in-guest actions can be performed only by using NGT.
- Only Async-DR workflow is supported for the self service restore feature.
Requirements and Limitations for VMs Running Windows Operating System
- Ensure that sufficient logical drive letters are available to bring the disk online.
- Dynamic disks comprising of NTFS on simple volumes, spanned volumes, striped volumes, mirrored volumes, and RAID-5 volumes are not supported.
- Only 64-bit operating system is supported.
- Following operating systems are supported:
- Windows Server 2008 R2 or later versions
- Windows 7 through Windows 10
- Java Runtime Environment (JRE) build 1.8+
Requirements and Limitations for VMs Running Linux Operating System
- Only extended file system (ext2, ext3, and ext4) and XFS file systems are supported.
- Logical Volume Manager (LVM) disks for which the volume group corresponds to only a single physical disk are mounted.
- Whenever the snapshot disk has an inconsistent filesystem (as indicated by the fsck check), the disk is only attached and not mounted.
- Following Operating Systems are supported:
- CentOS 6.5 through 6.9 and 7.0 through 7.3
- Red Had Enterprise Linux (RHEL) 6.5 through 6.9 and 7.0 through 7.3
- Oracle Linux 6.5 and 7.0
- SUSE Linux Enterprise Server (SLES) 11 SP1 through 11 SP4 and 12 SP1 through 12 SP3
- Ubuntu 14.04 for both AHV and ESXi and 16.10 (AHV only)
The Nutanix administrator should deploy NGT on the VM and then enable this feature. After the feature is enabled and a disk is attached, the guest VM administrator can recover files within the guest operating system. If the guest VM administrator fails to detach the disk, it gets automatically detached from the VM after 24 hours.
Procedure
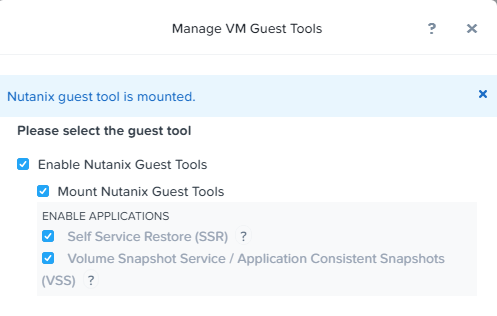
- To enable self service restore, click Manage Guest Tools.
- Click the Self Service Restore (SSR) check box.
- The Self Service Restore feature is enabled on the VM. The guest VM administrator can restore the desired file or files from the VM.
- Click Submit.
Self Service Restore using the GUI
Note: The GUI steps are for Linux VM’s. However, the Windows GUI process is almost identical.
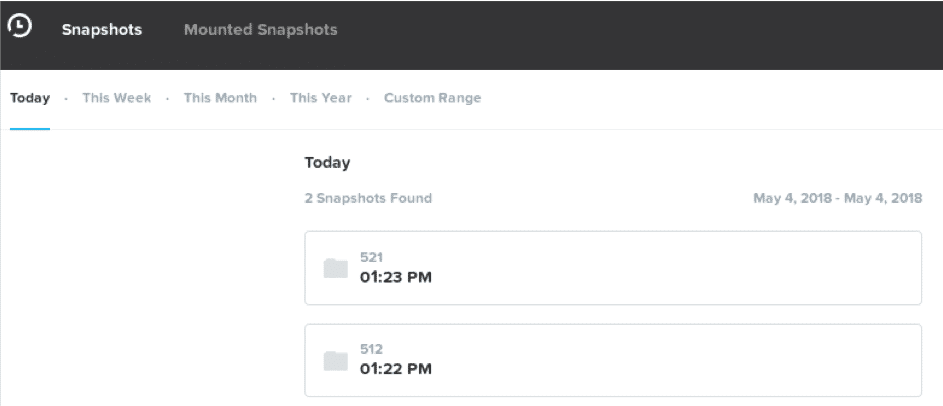
Step 1: View and Select Snapshots
The SSR console is accessed inside the Linux VM using a Web Browser pointing to http://localhost:5000 to list and select from available snapshots.
The snapshots that are taken for that day are displayed. Select the appropriate tab, This Week, This Month, This Year. You can also customize the selection by clicking Custom Range tab and selecting the date range in the From and To fields. Select the check box of the disks that you want to attach from the snapshot.
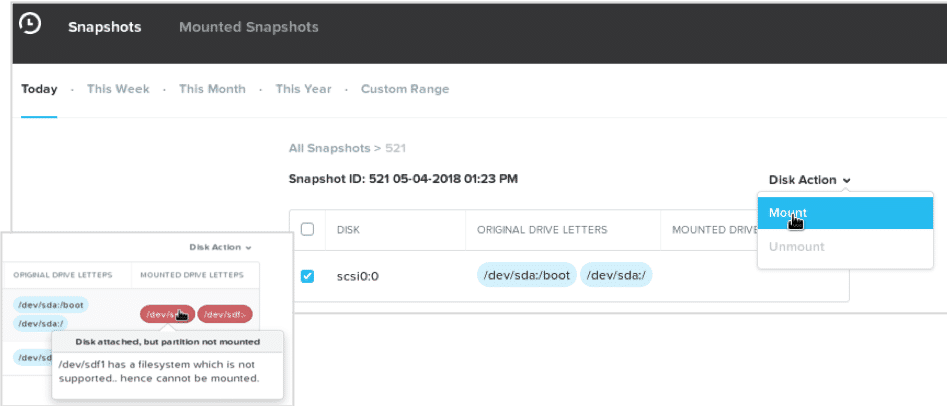
Step 2: Mount Disk
From the Disk Action drop-down menu, select Mount. The selected disk or disks are mounted and the relevant disk label is displayed.
Note: If a snapshot’s filesystem is not supported, trying to mount the results in showing the disks in RED instead of blue. As the message states, the disk is attached but will not be mounted.
Step 3: Restore Files
Go to the attached disk label partitions in the VM and restore the desired files.
Note: If the disk gets updated between the snapshots, the restore process may not work as expected. If this scenario occurs, you need to contact support to help with the restore process.
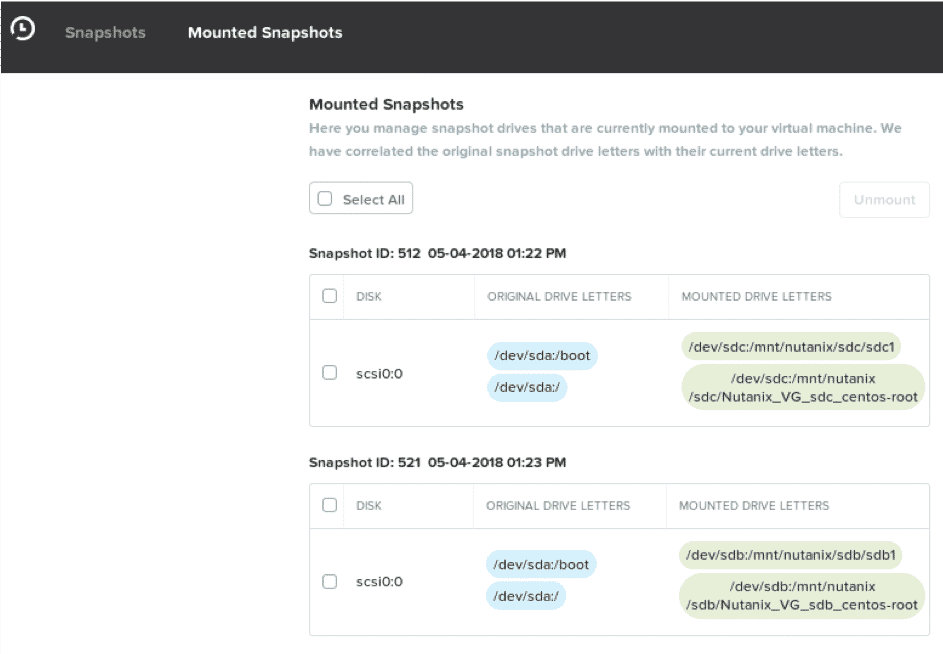
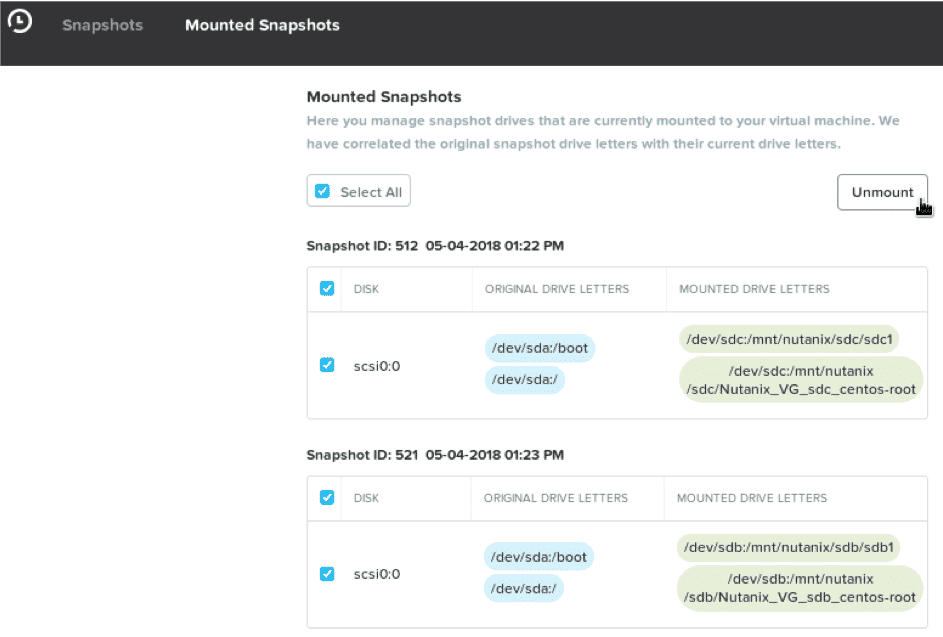
Step 4: View the Mounted Disks
View the list of all the mounted snapshots under the Mounted Snapshots.
- This page displays the original snapshot drive letters and its corresponding current drive letters.
- The original drive letters gets assigned to the disk at the time of the snapshot.
- Mounted drive letters are on which the snapshotted disk is mounted right now.
Step 5: Unmount Disks
There are 2 ways to perform this operation.
Option 1: Click the disk label and click Unmount.
You can unmount all the disks at once by clicking Select All and then clicking Unmount.
Option 2: To detach a disk, select the check box of the disk that you want to unmount. Then, from the Disk Action drop-down menu, select Unmount.
Windows Command Line:
To perform a self service restore on Windows VMs using ngtcli, here’s what you need to do:
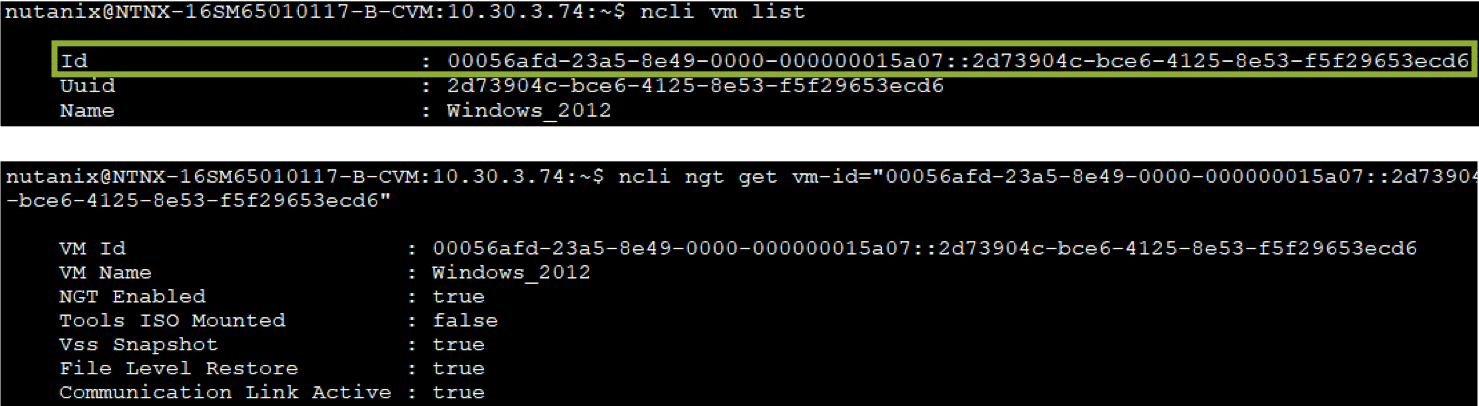
Step 1: Show NGT settings: Single VM
Get Nutanix Guest Tools for individual VM using the below command
ncli nutanix-guest-tools get vm-id=”vm_id”
Use the VM ID from ncli vm list to show NGT related setting for single VM.
Step 2: Change to ngtcli directory
C:\Program Files\Nutanix\ngtcli
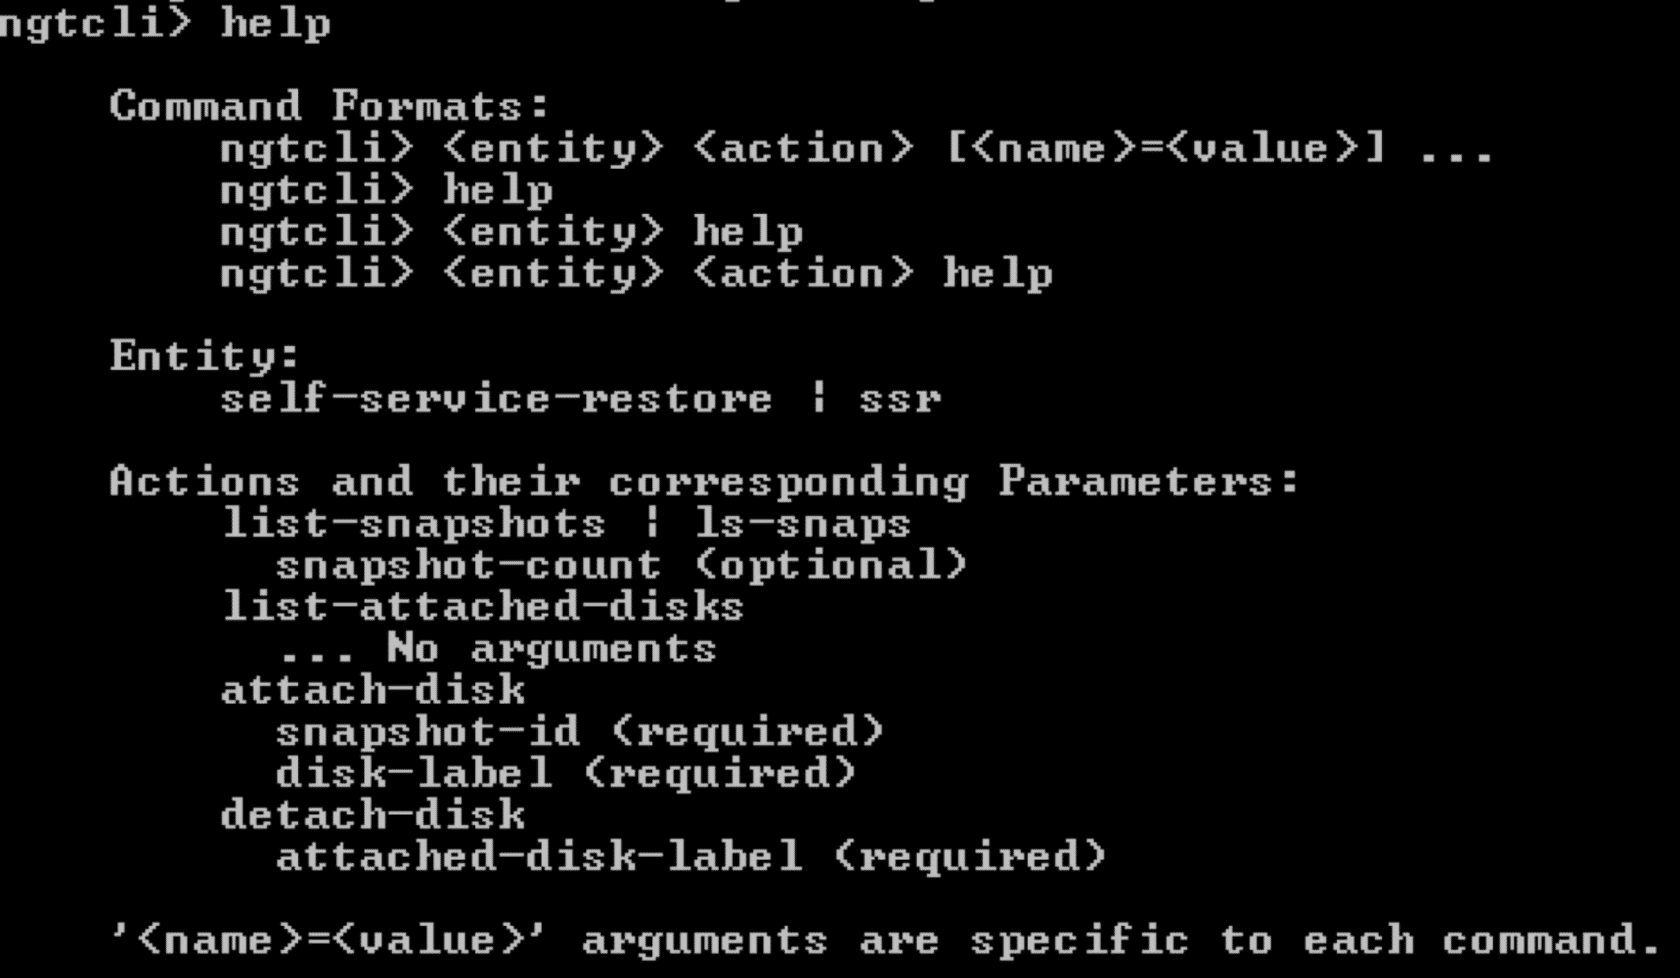
Step 3: Run the command ngtcli.cmd
The ngtcli> help command is used to show available commands.
Step 4: List the Snapshots
List the snapshots and virtual disks that are present for the guest VM by using the following command.
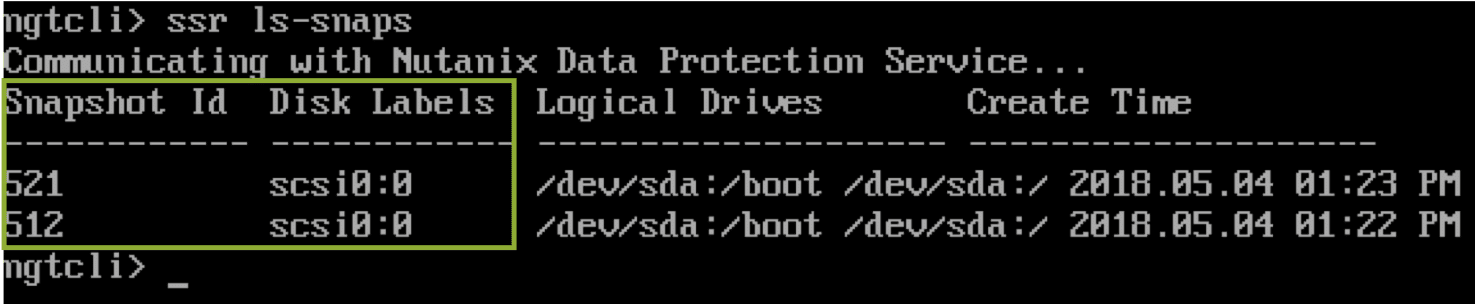
ngtcli> ssr ls-snaps
The snapshot ID, disk labels, logical drives, and create time of the snapshot is displayed. The guest VM administrator can use this information and take a decision to restore the files from the relevant snapshot that has the data.

Step 5: Attach the Disk from the Snapshots
To attach a disk from a snapshots, use the following command.
ngtcli> ssr attach-disk snapshot-id=<snapshot_id> disklabel=<attached_disk_label>
Example:
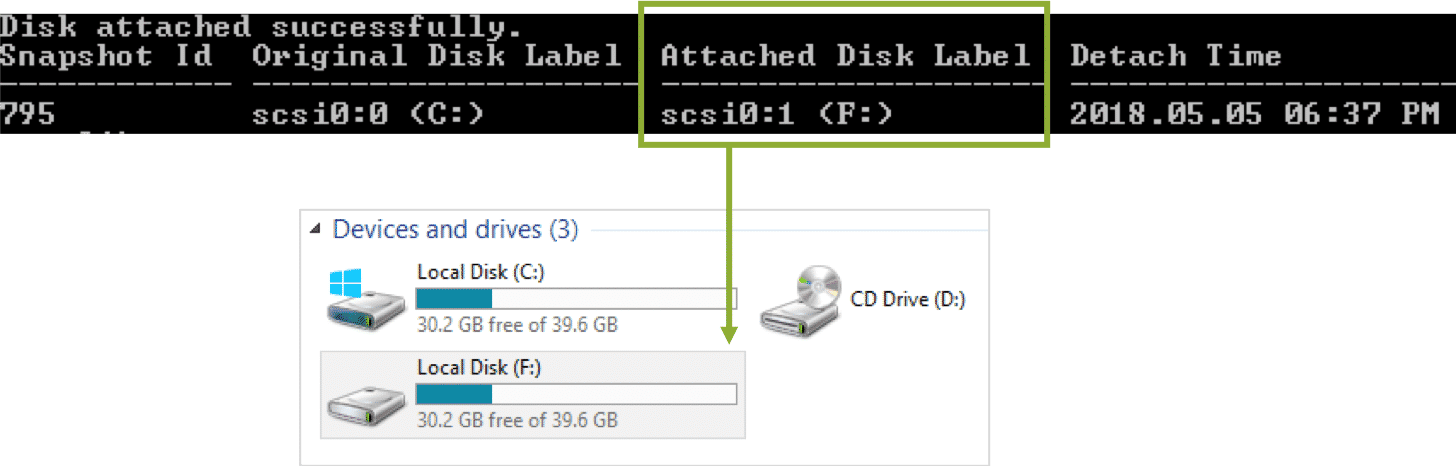
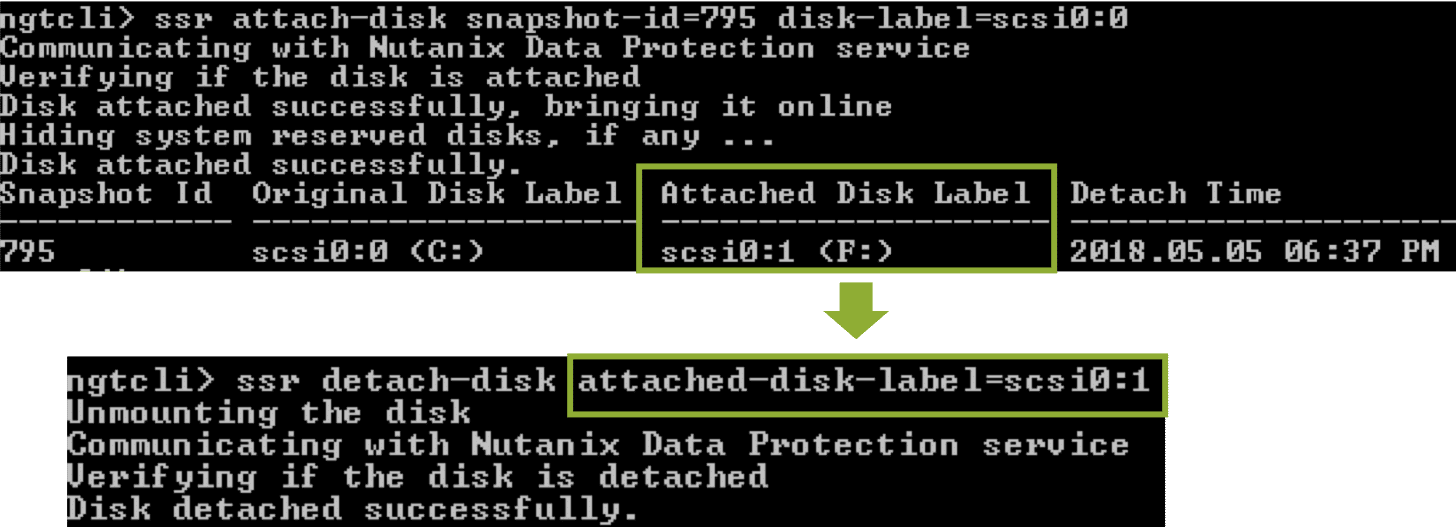
ngtcli> ssr attach-disk snapshot-id=795 disk-label=scsi0:0
Note: Be sure to use the Attached Disk Label, not the Original Disk Label.

Step 6: Restore Desired Files
After successfully executing the command, a new disk with its own drive label (here: “F“) is attached to the guest VM.
Navigate to the newly attached disk label drive and restore the desired files.
Step 7: Detach the Disk
To detach the disk, use the following command.
ngtcli>ssr detach-disk attached-disk-label=attached_disk_label
Replace attached_disk_label with the ATTACHED Disk Label (be sure not to use the Original Disk Label)
For example:
ssr detach-disk attached-disk-label=scsi0:1
If this task is not manually performed within 24 hours after taking the snapshot, the snapshot will be auto-removed.
Linux Command Line:
After the Linux guest VM user with sudo privileges installs the NGT software inside the guest VM, the user can restore the desired file or files from the VM.
Step 1: Verify NGT Services
Verify NGT Services are Running on Linux VM using one of the following commands.
service –status-all
/etc/init.d/ngt_guest_agent status

Step 2: Change to ngtcli directory
cd /usr/local/nutanix/ngt/ngtcli
Run help for an overview of ngtcli commands.
Step 3: Run NGT Python
./ngtcli.py
Step 4: List the Snapshots and Virtual Disks
List the snapshots and virtual disks that are present for the guest VM by using the ngtcli> ssr ls-snaps snapshot command. To list the snapshots with a specific number, use the following command.
ngtcli> ssr ls-snaps snapshot-count=count_value
- Replace count_value with the number that you want to list.
- The info provided is otherwise exactly the same.
Step 5: Attach the Disks
Attach the disk from the snapshots (use the snapshot ID and Disk Labels from the previous command: ngtscli> ssr lssnaps) using the following command:
ngtcli> ssr attach-disk disk-label=disk_label snapshot-id=snap_id
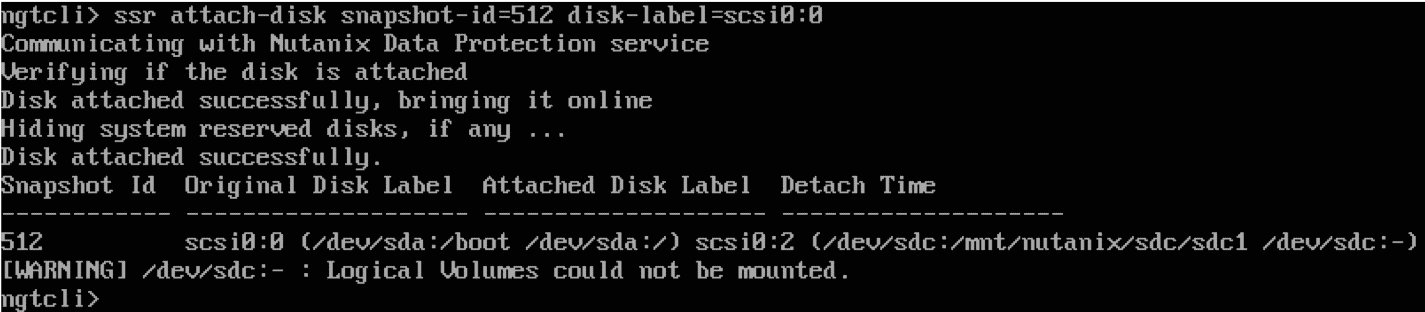
Example: To attach the disk with snapshot ID 521 and disk label scsi0:0
ngtcli> ssr attach-disk snapshot-id=521 disk-label=scsi0:0
Step 6: View Attached Disks
The attached disk(s) from the snapshots can be listed using ssr list-attached-disks. For every snapshot (ID), the output shows the Original Disk Label and the Attached Disk Label. If a disk was previously attached, but has been detached, the Original Disk Label and the Detach Time are shown instead.
Take note of the Attached Disk Label which is used during restore operations.

Step 7: Restore Files
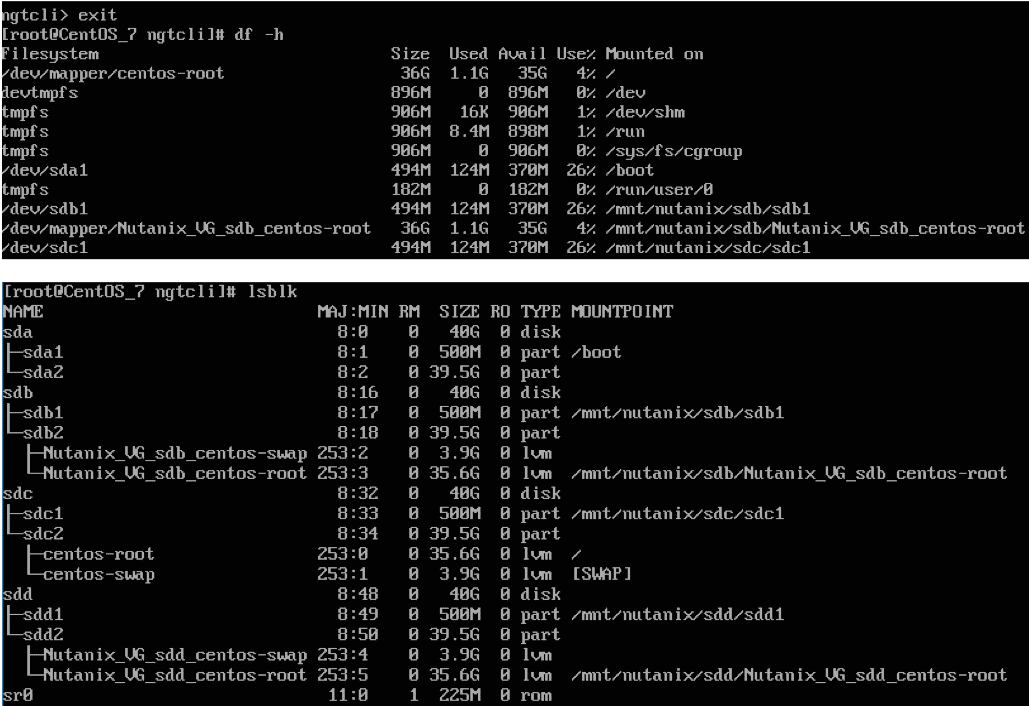
Exit ngtcli and change directory to the attached disk label partition and restore desired files.
You can use the lsblk or the df -h command to get an overview of the various mounted disks (snapshots).
Note: If the disk gets updated between the snapshots, the restore process may not work as expected. If this scenario occurs, you need to contact support to help with the restore process.
Step 8: Detach Disk
Detach the disk(s) manually using the command below. If the disk is not removed by the guest VM administrator, the disk is automatically removed after 24 hours.
You can use the ssr list-attached-disks command to obtain the Disk Label and Snapshot ID.
Command format:
ngtcli> ssr detach-disk attached-disk-label=<attached_disk_label>
Example: To detach/remove the disk with Snapshot ID 630 and Attached Disk Label scsi0:3
ngtcli> ssr detach-disk attached-disk-label=scsi0:3
Important: Be sure to use the Attached Disk Label, NOT the Original Disk Label.
