Deploy ABS to an AOS cluster (including Volume Groups, iSCSI Initiators, Discovery, CHAP)
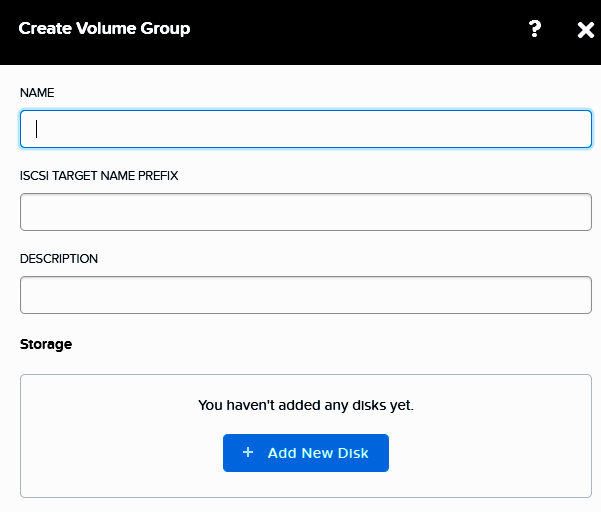
Creating a Volume Group for Use with Acropolis Block Services
- In the Storage dashboard, click the Volume Group button.
- The Create Volume Group dialog box is displayed.
- In Name, enter a name for the volume group.
- In Name, enter a name for the volume group.
- The iSCSI Target Name Prefix is auto-filled with the volume group Name. You can accept this prefix or enter your own target name prefix for the volume group. This entity has the same naming restrictions as Name.
- You also use iSCSI Target Name Prefix as the user name (username_in) if you configure Mutual CHAP authentication for Linux clients.
- In Description, provide a description for the volume group.
- To add one or more disks to the volume group, do the following:
- In the Storage section, click Add New Disk.
- In the Add Disk dialog box, select the storage container to use from the Storage Container pull-down list. The list includes all storage containers created on this cluster.
- In Size, enter the disk size in GiBs.
- Click Add.
- Repeat these steps to add another disk for this volume group, if desired.
From the command line
acli vg.create <vg_name>
acli vg.disk_create <vg_name> container=<container_name> create_size=<disk_size>
Add the Client iSCSI Initiators to the Volume Group
- Scroll down to the Access Settings section.
- Select Enable external client access if you are whitelisting clients that are external to or not residing in this cluster. Otherwise, leave this clear. If you select this checkbox, it remains automatically selected if you create more volume groups.
- If you are using one-way CHAP security, select CHAP Authentication and type a 12 to 16 character password (also known as a CHAP secret) in the Target Password field.
- Initiators must use the same password to authenticate to the AOS cluster.
- Click Add New Client to configure the initiators.
- Enter the client Initiator iSCSI Qualified Name (IQN) in the Client IQN/IP Address field to create the whitelist.
- [Option] Select CHAP Authentication and enter the iSCSI client password (secret) used when you configure Mutual CHAP authentication on the client. See Discovering the Volumes Target from the Windows Client, Configuring Mutual CHAP Authentication (Linux), or Adding iSCSI Targets on the AIX Host.
- Click Add.
- Access Control displays any configured clients. This list includes any clients attached to volume groups in the cluster.
- Click Add New Client in the Create Volume Group window to add more initiators allowed to access this storage.
- Repeat these steps until you have added all the initiators that you want to whitelist.
- Click Save.
Obtaining the Windows iSCSI Initiator
Obtaining the Linux iSCSI Initiator
On the Linux client, open a terminal window and type:
$ sudo cat /etc/iscsi/initiatorname.iscsi
For example, the command displays:
InitiatorName=iqn.1991-05.com.redhat:8ef967b5b8f
Discovering and Connecting the Acropolis Block Services Target from the Windows Client
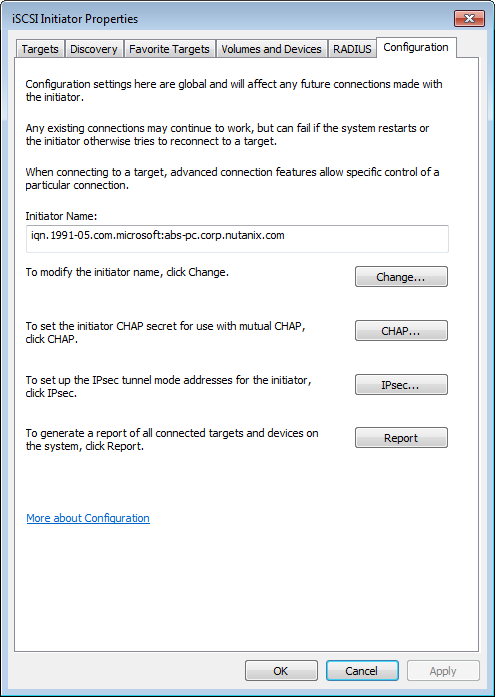
- Open the iSCSI Initiator Properties window.
- If iSCSI Initiator is not available from Administrative Tools, you can open it by clicking Start, typing iSCSI in the search box, and clicking iSCSI Initiator from Programs.
- In the iSCSI Initiator Properties window, click the Discovery tab.
- Click Discover Portal, add the external data services IP address for the Nutanix cluster, then click OK
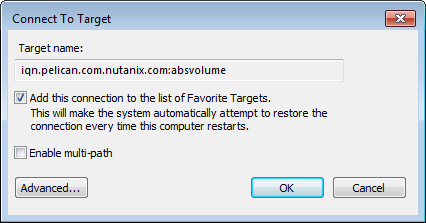
- To connect to the now-discovered ABS target, go to the Targets tab.
- Click Refresh. The ABS target is shown as Inactive.
- Select the target and click Connect.
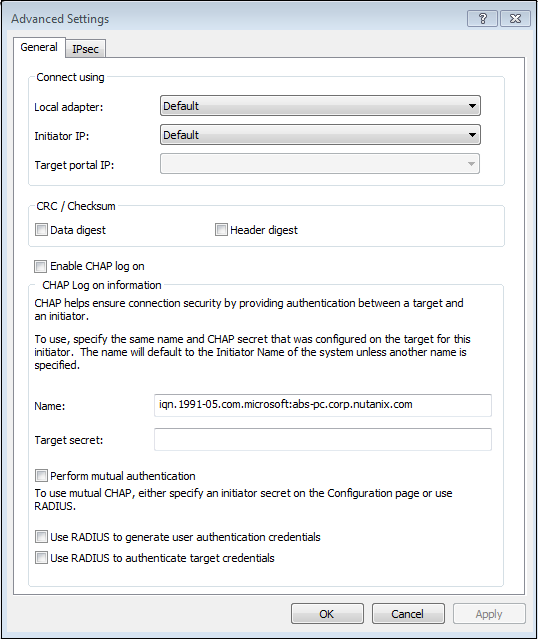
- Select Add this connection to the list of Favorite Targets to ensure this connection is persistent. Ensure that Enable multi-path is disabled (not selected).
- Click OK.
- The ABS target is now shown as Connected.

When using the Nutanix Volumes feature, it is recommended to disable MPIO since the DSF already provides multi-pathing using the DSF.
Discovering and Connecting the Acropolis Block Services Target from the Linux Client
- Ensure that the iSCSI service is started. For Red Hat Enterprise Linux 6.0:
$ sudo /etc/init.d/iscsi status
For Red Hat Enterprise Linux 6.7.
$ sudo service iscsid status
Note: If the iscsi status command returns any status other than running, start the service by typing sudo /etc/init.d/iscsi start.
- Discover the ABS target by specifying the external data services IP address on the default port 3260.
$ sudo /sbin/iscsiadm –mode discovery –type sendtargets –portal external_data_services_IP_address:3260
The command output will appear similar to external_data_services_IP_address:3260, 1 iqn_name, where iqn_name is the ABS target IQN.
- Connect the ABS target by specifying iqn_name from the previous command.
$ sudo /sbin/iscsiadm –mode node –targetname iqn_name –portal external_data_services_IP_address:3260,1 –login
Securing Initiators and The Nutanix Cluster Target with CHAP
For additional security, Volumes also enables you to use Challenge-Handshake Authentication Protocol (CHAP) authentication for iSCSI as part of Creating a Volume Group for Use with Volumes.
- Use one-way CHAP for basic security between the initiator and Nutanix cluster target. Nutanix recommends using one-way CHAP authentication.
- Use Mutual CHAP for additional security, where the client and target authenticate each other. When you configure a volume group, you can set a shared initiator CHAP secret, common and known only to the authenticator and peer. AOS manages the secrets, with the AOS iscsi_adapter implementing CHAP.
Configuring CHAP Authentication (Windows)
- In the iSCSI Initiator Properties window, click the Targets tab and select the Volumes target.
- Click Properties to configure CHAP Authentication.
- Ensure that Enable Chap log on is selected.
- Use the default Name as the initiator name
- Type the same password in the Target Secret field as the one you used in the Target Password field in the Prism web console Create Volume Group dialog box.
- For mutual CHAP authentication, select Perform mutual authentication. Otherwise, leave this setting cleared for one-way CHAP authentication.
- Click OK.
- [Mutual CHAP configuration only; otherwise skip this step.] In the iSCSI Initiator Properties window, click the Configuration tab.
- Click CHAP…, type a password (or secret) in the Initiator CHAP Secret field, and click OK
NOTE: There is an error in the Nutanix documentation for CHAP setup. “Enable CHAP log on” SHOULD be checked, not cleared.
Configuring Mutual CHAP Authentication (Linux)
- Log in to the linux server and get the name of the initiator(s).
$ sudo cat /etc/iscsi/initiatorname.iscsi
For example, the command displays:
InitiatorName=iqn.1991-05.com.redhat:8ef967b5b8f
Copy this name for use with the procedures in this section.
- Open the /etc/iscsi/iscsid.conf file with a text editor.
#*************
#CHAP Settings
#*************
#To enable CHAP authentication set node.session.auth.authmethod
#to CHAP. The default is None.
#node.session.auth.authmethod = CHAP
#To set a CHAP username and password for initiator
#authentication by the target(s), uncomment the following lines:
#node.session.auth.username = username
#node.session.auth.password = password
node.session.auth.username = iqn.somename.somedomain.com
node.session.auth.password = xxxxxxxxxxxxx
#To set a CHAP username and password for target(s)
#authentication by the initiator, uncomment the following lines:
#node.session.auth.username_in = username_in
#node.session.auth.password_in = password_in
node.session.auth.password_in = yyyyyyyyyyyyy
#To enable CHAP authentication for a discovery session to the target
#set discovery.sendtargets.auth.authmethod to CHAP. The default is None.
#discovery.sendtargets.auth.authmethod = CHAP
#discovery.sendtargets.auth.authmethod = CHAP
#To set a discovery session CHAP username and password for the initiator
#authentication by the target(s), uncomment the following lines:
#discovery.sendtargets.auth.username = username
#discovery.sendtargets.auth.password = password
#To set a discovery session CHAP username and password for target(s)
#authentication by the initiator, uncomment the following lines:
#discovery.sendtargets.auth.username_in = username_in
#discovery.sendtargets.auth.password_in = password_in
Search for the CHAP SETTINGS section in the file. You might see text similar to the following.
- Configure Mutual CHAP authentication. Be sure to uncomment any commented lines by removing the hash character [#], as shown here.
- Enable CHAP authentication.
- Set node.session.auth.authmethod to CHAP. The default is None.
- Example: node.session.auth.authmethod = CHAP
- Configure the initiator user name (initiator IQN) and initiator password.
- node.session.auth.username = initiator_IQN
- node.session.auth.password = password
- Configure the Volumes target IQN user name and password.
- The user name and password are derived from the Add the Client iSCSI Initiators to the Volume Group procedure:
- Use the iSCSI Target Name Prefix as the username_in.
- Use the Target Password as the password.
- node.session.auth.username_in = username_in
- node.session.auth.password_in = password
- Use the Target Password as the password.
- Enable CHAP authentication.
- Save and exit the file. Log out of any connected sessions and perform a discovery. See Discovering the Volumes Target from the Linux Client.
- Repeat for any additional initiators used with Volumes.
Here is a pretty good article I came across that details how to setup CHAP Authentication in Linux.