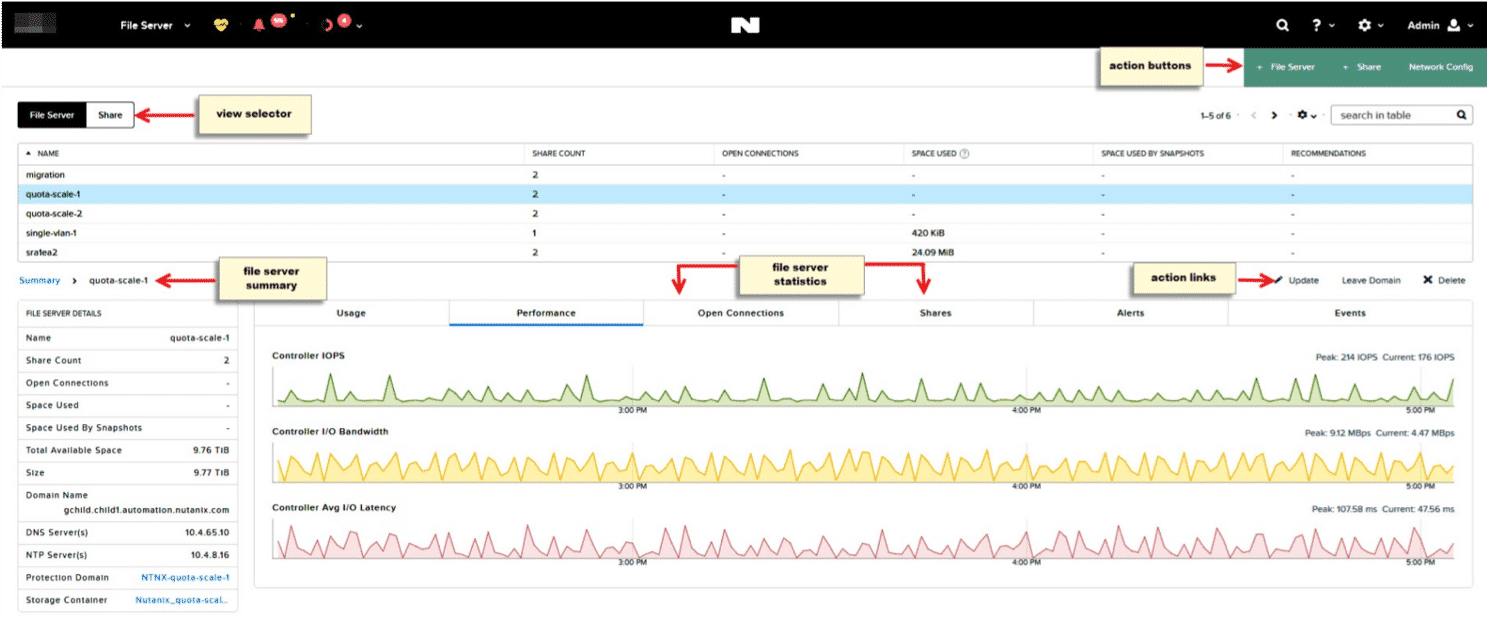
Manage an AFS cluster
- Click the File Server tab to display the list of file servers.
- Select the target file server in the table.
- The Summary line (middle of screen) displays the file server set of relevant action links on the right.
- The possible actions are:
- Activate (if file server is deactivated)
- Protect+
- Share
- Update
- Join Domain
- Leave Domain
- Delete
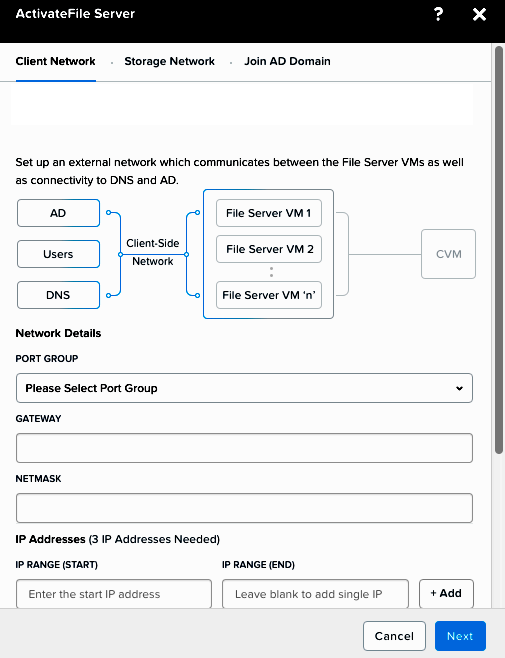
- To activate the file server.
- Go to the Prism web console of the remote site for the file server.
- Navigate to Home > File Server.
- Select the File Server view and select the name of the file server you want to activate.
- The Activate action button is displayed.
- Click Activate to open the File Server window.
- Complete the indicated fields initially completed while Creating a File Server.
Note: Some file server information is already populated.
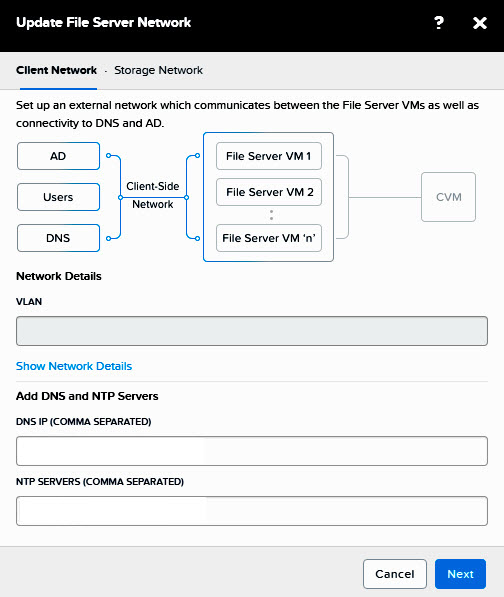
- To update the file server, click the file server from the file server list and then click Update in the task bar.

- Select an option from the Update list and click Continue.
- File Server Size: Update the size of the file server in GiB.
- Number of File Server VMs: Increase or decrease the number of VMs in the file server that are used by the client side network.
- File Server VM Configuration: Update the number of CPUs or memory size per file server VM.
- Network Configuration: View or update the Network Configuration.
- VLAN or Port Group: Files does not allow this element to be changed after file server creation.
- DNS IP: Add the DNS servers the client side network uses. Separate DNS server addresses with commas.
- NTP SERVERS: Add the NTP servers that are connecting externally. Separate NTP server addresses with commas.
- Click Save.
- To join or leave a domain, see Domains.
- To delete a file server:
- Caution: Deleting a FSVM can result in data loss. Be sure that you archive or back up data stored on a FSVM that you plan to delete.
- Select the file server from the file server list and click Delete in the task bar.
Starting a Files Cluster
To start a Nutanix cluster, you must log into the CVM that runs Files with SSH.
- Get a list of file servers
nutanix@cvm$ minerva get_fileservers
- To start a file server, enter the following command from one of the CVMs in the Nutanix base cluster.
- Replace file_server_uuid with the UUID of the file server.
nutanix@cvm$ minerva -f file_server_uuid start
- To start all file servers, enter the following command from one of the CVMs in the base Nutanix cluster:
nutanix@cvm$ minerva -a start
Stopping a Files Cluster
To stop a Nutanix cluster, you must first stop Files deployed on that cluster.
- Get a list of file servers using the following command.
nutanix@cvm$ minerva get_fileservers
- To stop a single file server, enter the following command from one of the CVMs in the base Nutanix cluster.
- Replace file_server_uuid with the UUID of the file server.
nutanix@cvm$ minerva -f file_server_uuid stop
- To stop all file servers, enter the following command from one of the CVMs in the base Nutanix cluster.
nutanix@cvm$ minerva -a stop
- When all the file servers stop, you can proceed with preparing the cluster for shutdown.
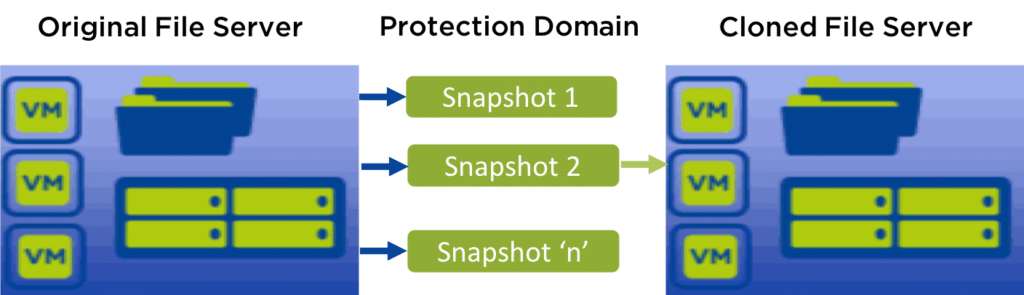
Cloning
The Files cloning feature allows you to clone any file server protection domain snapshot at the local or remote site.
Cloning helps with the following without impacting the original Files cluster:
- Create backups at the primary and secondary sites
- Undertake DR test at secondary site
- Note: The secondary site must use AOS 5.1.1 or later.
- Recover a file server from a specific point in time
- Spin-up a file server at the primary or remote site for testing or development purposes
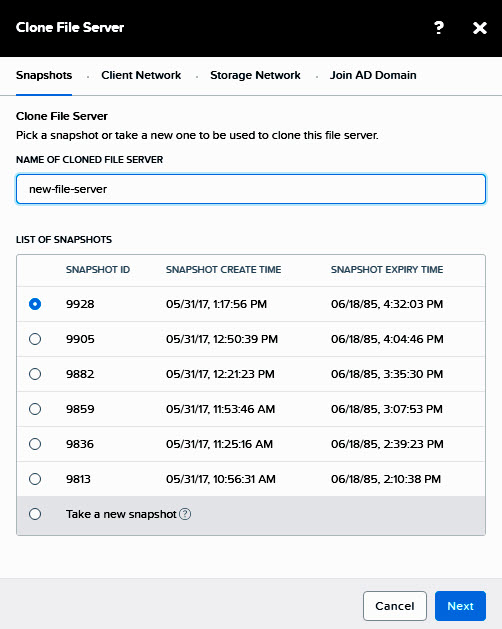
- Log into the web console with your user name and password. Go to the File Server page.
- From the action links, click Clone.
- The Clone File Server window is displayed.
- Note: The clone of the file server cluster must have a different name than the original file server cluster.
- Select the file server snapshot to clone.
- You can select from a previously created snapshot in the List of Snapshots. Click Next.
- Do not use the same IP addresses from the original file server for the file server clone.
- Follow the steps for Clone File Server which are similar to creating a new file server (see Creating a File Server. Click Save.
Cloning in Files using Data Protection
- In the Prism web console, go to Home > Data Protection
- Select the Table view and select a Protection Domain
- Click Local Snapshots and click Restore
- Restore takes you to the Clone File Server pop-up where you can enter the information for continuing the cloning process from a previous snapshot
Rename a file server cluster
- Log into one of the CVMs in the AOS cluster.
- The file server that will be renamed, must be unjoined from the domain.
- To rename the file server, use the following command.
- To get the UUID, see Creating a File Share.
ncli fs edit name=new_fs_name uuid=file-server-uuid
- Replace new_fs_name with the new name for the file server cluster.
- Replace file-server-uuid with the current UUID for the file server cluster.
- The new file server name can be viewed in the nCLI or the web console.
Files Administrator Support
- Log into the web console and go to Home > File Server.
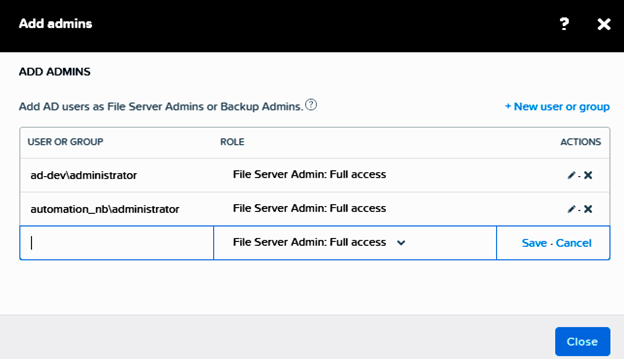
- Click the File Server view and click Add Admins.
- The Add Admins pop-up window is displayed.
- To create a new administrator role for the file server, click + New user or group.
- In the blank text box, add the AD users or groups as file server or back up admin.
- User or group names must be given as samAcctName or NETBIOS\samAcctName format.
- Click the drop-down menu for Role and select the File server admin or Backup admin role. Click Save.
Managing a File Share
- To view the share information, click the Share tab on the left and select the share.
- To rename a file share.
- In the File Server page, select the Share tab.
- Select a share and then click Update.
- In the Name text box, type the update name for the file share. Click Save.
- Note: When renaming a share, access to the old name will remain as long as the existing connection is maintained. Close and reopen the browser or CLI to no longer see the old name.
- Note:
- Remove the share contents and disconnect all clients before deleting a share.
- Deleting a home directory is allowed even if the directory and subdirectories contain files.
- Caution: Deleting a share is permanent and the share cannot be recovered.
- To delete a share, click on the share from the share list and click Delete in the task bar.
Accessing User Home Shares
Be sure to have the following requisites.
- User home directories are top-level directories in the home share.
- User home directories have the required permissions.
The following CLI commands are supported for FSVMs where the home shares are located. Files home share support is automatically enabled. The user can access his home share directly using the UNC path if the user profile exists in one of the home shares.
Note: If a user’s home directory exists in multiple home shares, Files matches to the first share created chronologically.
User home directories can be accessed using the universal naming convention (UNC) path \\AFS_server\SamAccountName instead of \\AFS_server\home_share\SamAccountName.
User home shares are visible with other shares in Files when enumerating shares on the file server.
User home share support is enabled by default.
- To enable user home share support:
nutanix@fsvm$ scli smbcli set –section global –param “enable user homes” –value Yes
- To enable dollar user home share access.
nutanix@fsvm$ scli smbcli set –section global –param “template user homeshare” –value“%U$”
Managing Quotas
- In the Prism web console, click Home > File Server. Click Share.
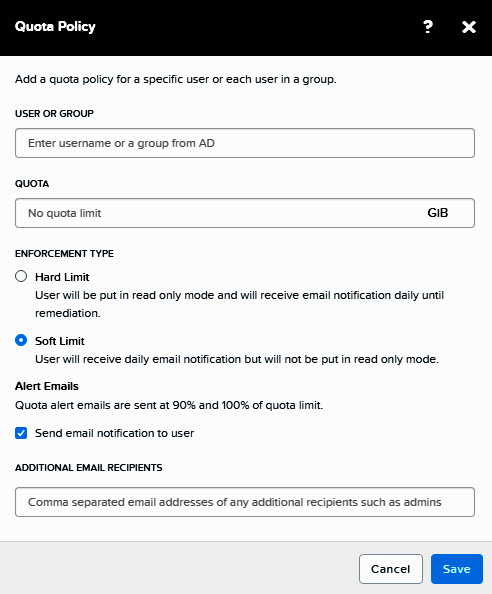
- Select the share name and click + Add Quota Policy.
- Enter the Active Directory Domain Services (AD) names for the group or user.
- Enter the space for the quota limit (in GB).
- Select the Enforcement Type.
- Hard Limit: Prevents further writes once quota limit is reached.
- Soft Limit: Does not prevent writes. Sends email notifications to email recipients.
- Enable email notifications and add additional email recipients. Click Save
- Edit an existing quota policy.
- Select the share in the Share tab.
- Click the Quota tab and select the quota. Click the pencil icon
- You can edit the existing policy by updating the amount of space (GB), the enforcement type (hard or soft limit), and the email notifications and recipients. Click Save.
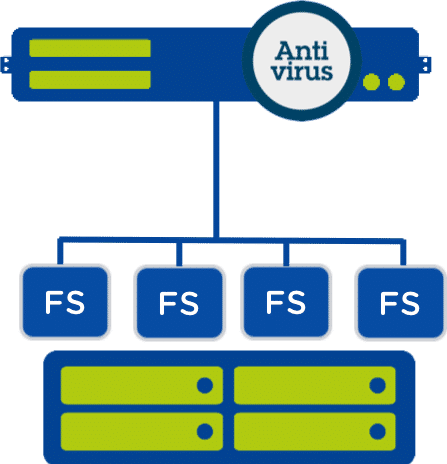
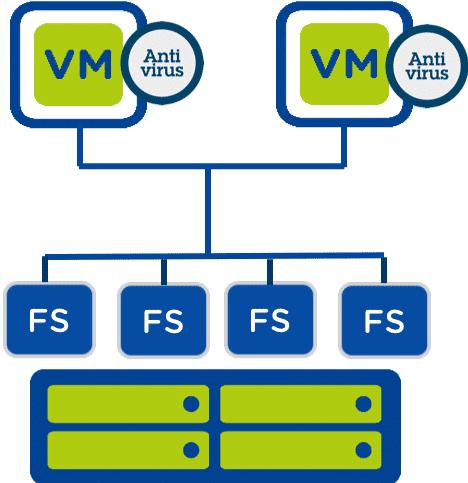
Inline Anti-Virus
Nutanix Files can leverage 3rd-party Anti-Virus solutions for security. These include:
- Symantec
- McAfee
- Sophos
- Kaspersky
The Antivirus solution runs outside of the Files Server cluster, and is setup and maintained through Prism.
This can be easily set up and maintained through Prism. Nutanix chose ICAP (Internet Content Adaptation Protocol) as that is a standard protocol supported by several security vendors and products. Before access to a file is granted (or denied), the file is scanned for viruses. The AV scanner is running outside the Files Server cluster (not native).
Windows Server with anti-virus software installed for centralized (scheduled) scans
Should your antivirus vendor not support ICAP, you can scan the shares by installing an antivirus agent onto a Windows machine and then mounting all the shares from the file server. This approach allows you to schedule scans during periods of low usage.
At the desktop or client level, you can set your antivirus solution to Scan on Write or Scan only when files are modified. You can configure high-security environments to scan inline for both reads and writes.
Anti-virus agents running within clients for inline [distributed] scanning
Customers are able to secure sensitive company data with in-line virus scans using popular AV solutions from Symantec and McAfee.
Nutanix chose ICAP (Internet Content Adaptation Protocol) that is a standard protocol supported by several security vendors and products.
Parallel Connections per FSVM
File scanning (anti-virus) is randomly dispatched among all the ICAP servers. For each ICAP server, no more than 10 parallel connections are spun up per FSVM.
As soon as the current scan finishes, the next file is picked up from the queue, which keeps the number of active connections at 10. With heavier workloads, which may encounter many scan requests and use all connections, the scan servers with more processing power scans more files.