Deploy AFS to an AOS cluster (including a File Server and File Shares)
Files Features
- Share-level, Directory-level, and File-level Access Control Lists (security descriptors)
- Support for Alternate Data Streams, Shared-mode Locks, and OpLock
- Quota
- Hard limit only enforceable once user is under limit again (if changing from Soft to Hard)
- Access-based Enumeration
- Hourly Snapshots (WPV) and latest 24-hour retention policy
- AHV and ESXi support
- Many-to-One Replication
- Hypervisor-Specific Support
- Nutanix supports ESXi and AHV for Files
Prerequisites Precheck Window
Your system must meet precheck requirements when creating a file server. If your system does not meet the requirements then the file server displays a pre check window in the Prism web console. Complete the precheck information, which includes the following:
- Latest Files Software
- Available Data Service IP Address
- Available Storage and Client Networks
- Registered vCenter (for ESXi)

Files Licensing

Files Requirements
Be sure your environment meets the following requirements before running Files.
- Configured and defined internal (storage) networks
- Configured and defined external (client side) networks
- Distributed File System (DFS) enabled (on by default for Windows clients)
- Network Time Protocol Server access
- Minimum of one (1) network (two (2) networks recommended)
- Minimum of 4 vCPUs (per host)
- Minimum of 12 GiB of memory (per host)
- Minimum domain administrator credentials access or user with delegated permissions
- vCenter registration (ESXi clusters)
- All ESXi hosts are added under the same ESXi cluster and that one FSVM is placed per ESXI host. This leverages the HA and DRS features.
Network Requirements (Managed and Unmanaged)
Files requires a set number of IP addresses for network configuration. To ensure you have the correct number of IP addresses, meet the following requirements for each network.
For storage networks, be sure you have one more IP address than the number of FSVM nodes. For external networks, be sure you have the same number of IP addresses as the number of FS VM nodes. Consider the following examples, where N is the number of FS VM nodes.
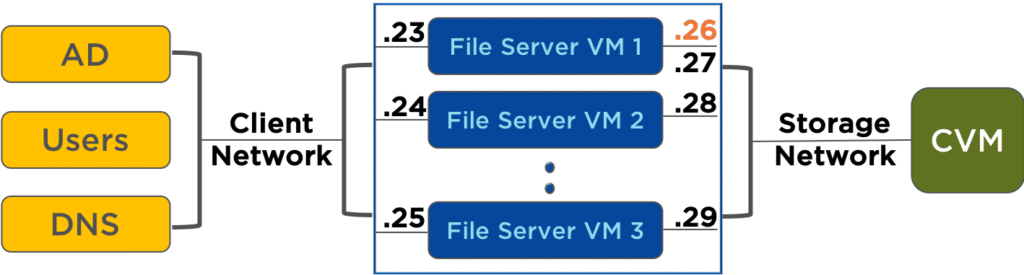
- Storage Network: N+1
- Client Network: N
- Note: IP addresses do not need to be sequential.
Ensure that the external and storage networks use a tagged VLAN. This will block client access from the storage network. The external and storage networks must have separate subnets if the networks are not the same. If the same network is used for both clients and storage, then IP addresses must be unique.
File Server Capacity
When the file server capacity or the container capacity reaches 100 percent, all shares within the file server become read-only and write privileges are blocked. The Prism web console displays alerts when the file server capacity or the container capacity reach 90 percent and when either reach 100 percent capacity.
Downloading Files
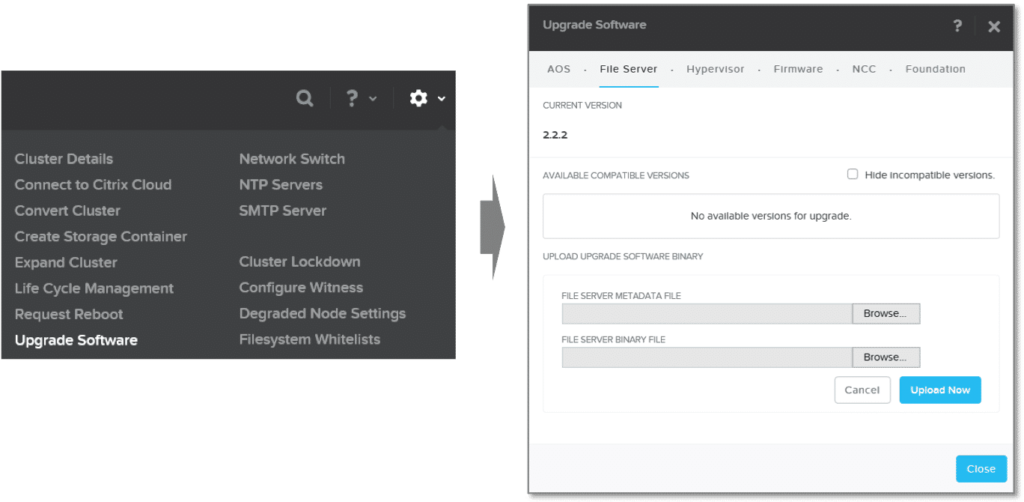
- Log into the Prism web console with your credentials
- Click the gear icon on the top right of the screen
- Click Upgrade Software
- The Upgrade Software window is displayed
- Select the File Server tab and complete the software download
- Select Download for the Files version you want to download
- Upload the Files binary from a different source by selecting Upload the Files binary (new file servers are created with the latest uploaded or downloaded Files release)
- Click Upgrade (Existing file servers upgrade to the selected Files version)
Creating a File Server
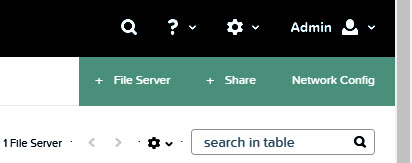
- In the Prism web console, go to the File Server page by clicking Home > File Server in the left corner.
- Click + File Server.
- If the Pre check window appears, follow the instructions before creating a new file server.
- Note: Be sure all ESXi hosts are added under the same ESXi cluster and that one FSVM is placed per ESXI host. This leverages the HA and DRS features.
- In the New File Server window, complete the Name and File Server Storage fields in Basics.
- Name: Type the name for the file server.
- Note: The file server name is used by clients to access the file server and must be unique in the AD Domain.
- File Server Storage: Type the file server size (in TiB).

- For Performance Configuration, Files automatically recommends the number of file server VMs, vCPUs per VM, and memory per VM. You can also manually enter the file server configuration or select the configuration based on workload performance.
- If you are satisfied with the recommendation, click Next.
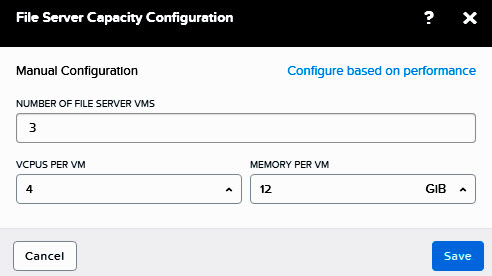
- To change the recommendation manually, click Custom Configuration > Configure Manually.
- Enter the number of File server VMs.
- Use the drop-down menu for vCPUs per VM.
- Use the drop-down menu for Memory per VM.
- Click Save.
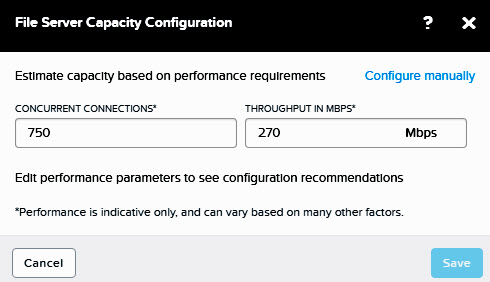
- To change the configuration based on performance requirements, enter the number of Concurrent Connections and the throughout in Mbps. Click Save
- Click Next.
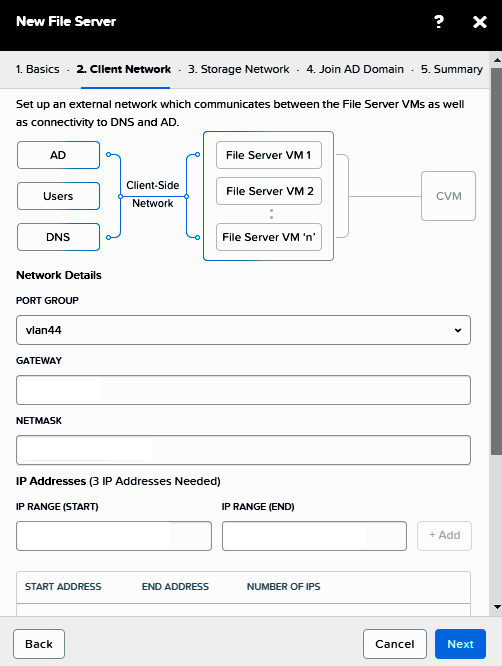
- Complete the fields in Client Network.
- If you are using ESXi, complete the fields for Network Details.
- PORT GROUP: From the drop-down menu, select the port group.
- GATEWAY: Type the Gateway address (this address is the router interface connected to the local network).
- NETMASK: Type the Netmask address (the 32-bit mask that divides an IP address).
- If you are using AHV, complete the fields for Network Details.
- VLAN: From the drop-down menu, select the managed or unmanaged VLAN.
- GATEWAY: For unmanaged VLANs, type the Gateway address (this address is the router interface connected to the local network).
- NETMASK: For unmanaged VLANs, type the Netmask address (the 32-bit mask that divides an IP address).
- Complete the fields for the IP addresses for ESXi port groups and AHV unmanaged VLANs (3 IP addresses minimum).
- To add new ranges, type the IP addresses into IP RANGE (START) and IP RANGE (END) and click +Add to add the range.
- To add a single IP address, type the address in IP RANGE (START) and click +Add.
- To edit IP ranges, click the pencil icon in the IP address row and edit the information.
- To delete an IP range, click x in the IP address row.
- Add the addresses for the DNS and NTP servers.
- DNS IP: Type the addresses and separate multiple addresses with commas.
- NTP SERVERS: Type the server addresses and separate multiple addresses with commas.
- Click Next.
- If you are using ESXi, complete the fields for Network Details.
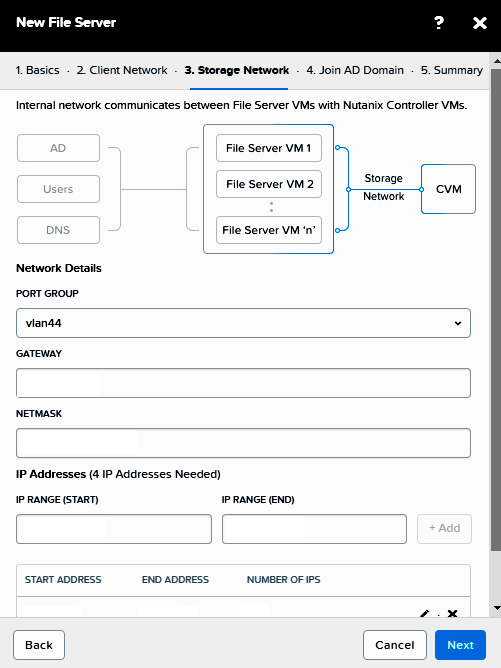
- Complete the fields in Storage Network.
- Complete the fields for Network Details.
- VLAN or PORT GROUP: From the drop-down menu, select the VLANs for ESXi or select the port groups for AHV.
- GATEWAY: Type the Gateway address (this address is the router interface connected to the local network).
- NETMASK: Type the Netmask address (the 32-bit mask that divides an IP address).
- Complete the fields for the IP addresses (4 IP addresses minimum).
- Note: IP addresses do not need to be sequential.
- To add new ranges, type the IP addresses into IP RANGE (START) and IP RANGE (END) and click +Add to add the range.
- To add a single IP address, type the address in IP RANGE (START) and click +Add.
- To edit IP ranges, click the pencil icon in the IP address row and edit the information.
- To delete an IP range, click x in the IP address row.
- Click Next.
- Complete the fields for Network Details.
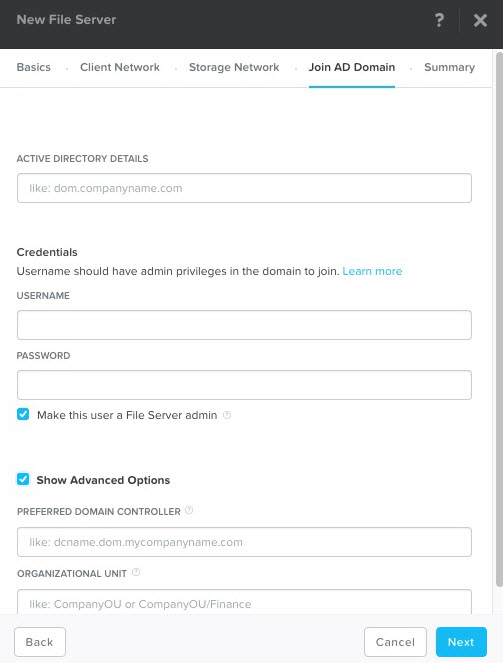
- Join the file server to an Active Directory domain and click Next.
- Note: Files creates a default home share for user home directory and user profiles. Individual user home directories must be created at the root of the Home share for optimal performance.
- Domain Name: Type the name for the active directory.
- Credentials: Type the user name and password for the domain.
- Check the box Make this user a File Server admin if you want to give this user admin privileges (see Files Administrator Support).
- Show Advanced Options: Check the box to display options for the preferred domain controller and the organizational unit.
- Preferred Domain Controller
- Organizational Unit
- Creating a file server might take several minutes.
- Note: Files creates a default home share for user home directory and user profiles. Individual user home directories must be created at the root of the Home share for optimal performance.
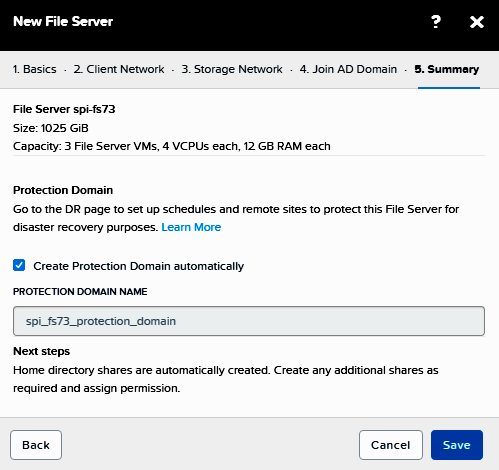
- The Summary tab displays the size and capacity information for the new file server. Files automatically creates a protection domain name for the file server.
- To change the protection domain name, replace the text in Protection Domain Name with the name of your protection domain.
- If the protection domain name is not provided, the default name will include NTNX-file_server_name.
- If the file server disconnects from the domain during file server creation, you can re-add the file server.
- From the Prism web console, navigate to the File Server page.
- Select the disconnected file server.
- In the action bar, the Join Domain button is displayed.
- Click Join Domain and complete the fields to connect the file server back to the domain.
Creating a File Share
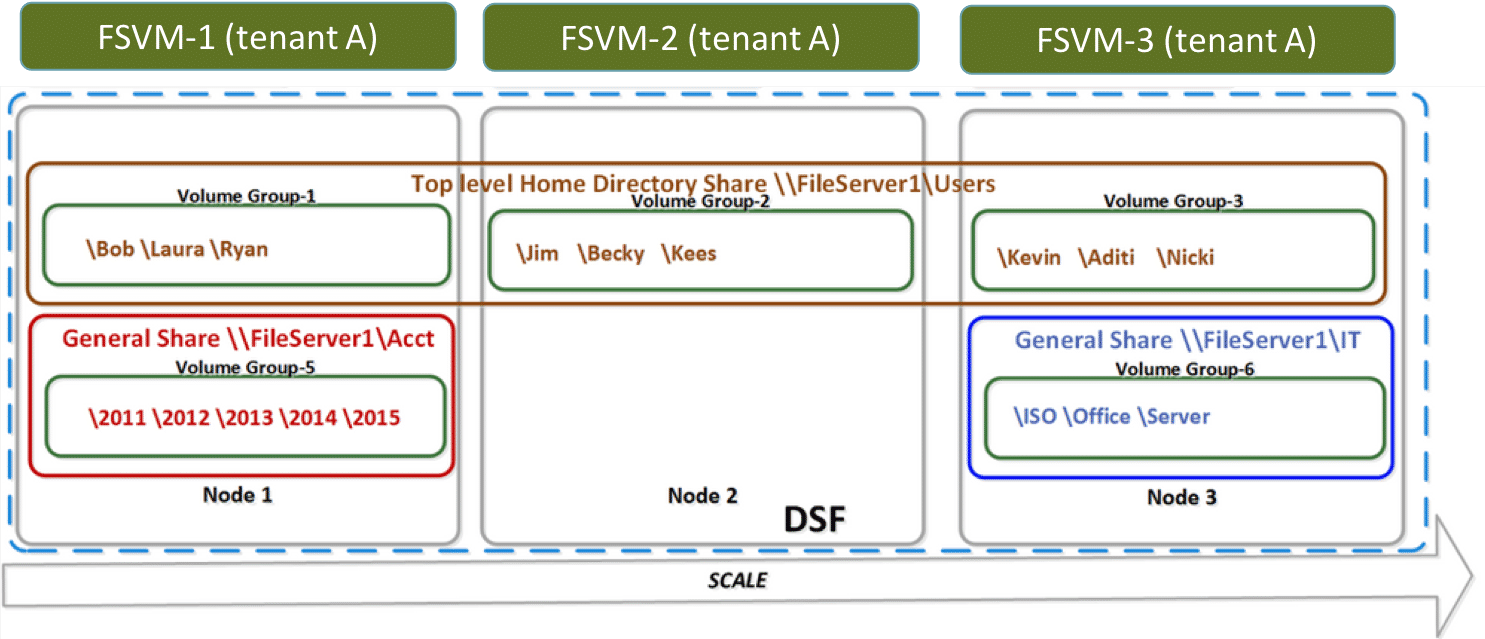
A home share is the repository for the user’s personal files, and a general purpose share is the repository shared by a group. By default, a share is created for home directories for each file server. This share is distributed at the top-level directories. Shares created after the default share are distributed across the FSVMs at the share-level. For example, share 1 contains top level directories such as User Directory 1, User Directory 2, and User Directory 3. User Directory 1 might be placed on FSVM 1, User Directory 2 might be placed on FSVM 2, and User Directory 3 might be placed on FSVM 3. These shares are not recommended for use with home directories.
Home Shares
- Automatically created upon Files deployment.
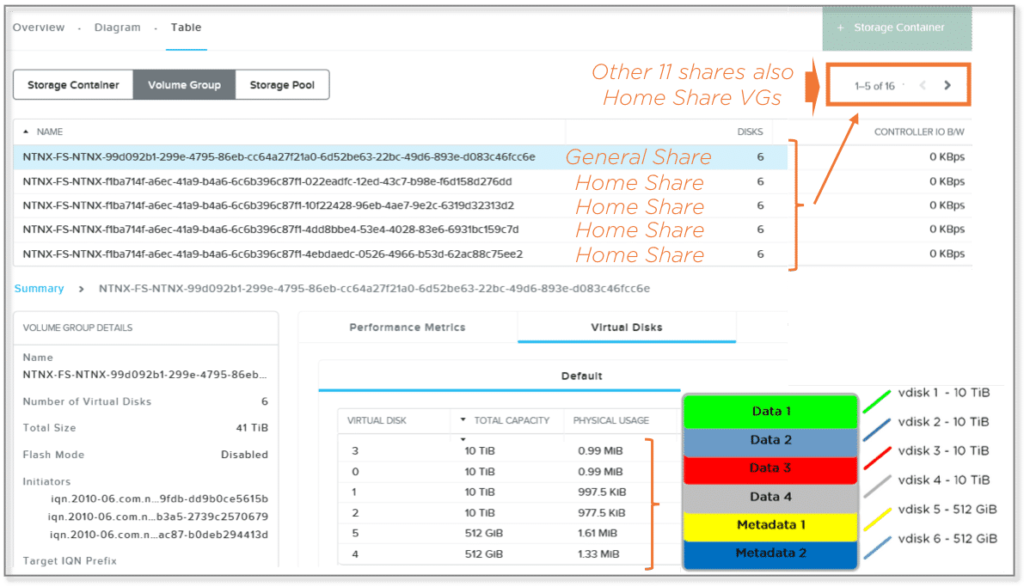
- Backed by 5 VGs/FSVM per File Server cluster.
Home Share Permissions
- Domain administrator: Full access
- Domain User: Read only
- Creator Owner: Full access (inherited only)
General Purpose Shares
- Backed by a Volume Group (VG) with 6 vDisks upon creation.
- To expand data storage, you can increase the Container size and add physical components to the Storage Pool, if needed.
General Purpose Share Permissions
- Domain administrator: Full access
- Domain User: Full access
- Creator Owner: Full access (inherited only)
Procedure
- In the Prism web console, go to the share by clicking Home > File Server in the main menu.
- Click + Share in the right corner.
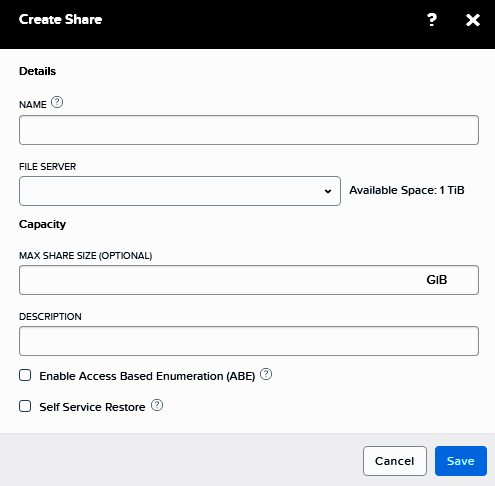
- The Create Share window appears.
- Complete the fields to create the file share.
- Fill in Details
- NAME: Enter the name for the share.
- Note:
- The following share names are not allowed:
- Global
- Printers
- admin$ (reserved)
- ipc$ (reserved)
- homes (reserved)
- Share names are not case sensitive.
- Each share name must be unique.
- Share name has a maximum of 80 characters.
- A blank space or space character cannot be used as the first or last character in the share name.
- Share names that end with the $ are hidden shares.
- The following share names are not allowed:
- FILE SERVER: From the drop-down list, select the file server to place the shares.
- Fill in Capacity
- Note: The maximum data size for each share is 40 terabytes.
- MAX SHARE: (Optional) Type the maximum size for the share (in GiB).
- DESCRIPTION: Type a description for the share for your information.
- Select options for the file share.
- Note: ABE and SSR can be simultaneously enabled.
- Enable Access-Based Enumeration (ABE): Access-based enumeration (ABE) is a windows (SMB protocol) feature that allows the users to view only the files and folders to which they have read access when browsing content on the file server. For information, see Access-Based Enumeration.
- Self Service Restore: Allow the share users to restore files from snapshots. For information, see Self-Service Restore. To retrieve files, see Retrieving Files (Self-Service Restore) in Files.
- Click Save.
- Fill in Details